Last year Apple gave us Core ML, an easy to use framework for running trained models on our devices. However the technology was not without its challenges. There were limited integration with third party frameworks, training was still a non trivial process, (which we covered last year on how to train your own Core ML model) and model sizes could run into 100s of MBs.
This year Apple introduced an array of solutions to address these challenges. Among them, more third party ML framework support, the ability to define custom models and layers, introduction of CreateML for easy training and quantization for size reduction.
In this post we are going to dig a little deeper into one of these new features: Quantization. Model size is one of the most common reason for skipping Core ML and opting for an online cloud solution. Fully trained models can go into 100s of MBs and can easily deter potential users from downloading our app. However if you followed WWDC’s What’s new in Core ML session we got a taste of quantization. An approach that can possibly cut down the size of a fully trained model by two third without losing much in accuracy or performance.
So let’s test it out together. We’re going to take a previously trained model for food classification and see what kind of size/accuracy trade off we can get through quantization.
But first, lets go over quantization and what it really means to quantize a model. The simplest way to explain the idea is to phrase it as “reducing the resolution on a model”. Each trained Core ML model comes with a finite number of weights that are set when the model’s trained. Imagine each of these weights representing 1 cm² on an image. If you have a high resolution image you can fit a lot of pixels in that space and get a crisp clear image. However if the purpose of your image is not to be as clear as possible, but for the person who is looking at it to figure out what they’re looking at, then you don’t need a lot of pixels in that 1 cm². If you’re looking at a picture of a pizza, you can opt for less pixels in each 1 cm² space and still get something that resembles a pizza. You can in fact do this by quite a bit and still get an image that’s clearly showing pizza. It’s at the lower end where things get a bit more complicated and the image starts to look like something that could be a plate of pasta or lasagna. Quantizing a model applies the same principle but instead of space and pixels, we’ll be dealing with numbers and bits.

A Core ML model could have tens of millions of weights, which by default are stored as Float32. A Float32 is a 32 bit single precision floating point number that takes 4 bytes. When we use a Float32 we have billions (231− 1) of possible values that our weight can take. It turns out we can reduce the possibilities to a smaller subset and retain most of our accuracy.
 (What’s new in Core ML, WWDC 2018)
When we quantize a model, we iterate through its weights and store them with smaller bit-sized numbers. Through quantization these Float32 weights can be stored as 16-bits or 8-bits and lower. The distribution of the quantization process can either be linear, linear lookup table, k-means generated look up tables or a custom look-up table function.
We can see that there are multiple options available to us. We have to pick a bit size we want to quantize down to and a function we want to use for the the quantization distribution. It’s important not to forget that quantization doesn’t come free, it will affect how the model performs. However we can quantize by quite a bit before we notice major reduction in accuracy.
So if there is a sweet spot between accuracy and quantization, where is it? How can we find it? The bad news is there is no simple formula, a lot of this will depend on your model and how it’s used. The good news is quantizing a model and testing it can be done fairly quickly. So lets Goldilock it.
We will quantize a model into all its possible bit levels and functions. Then we will run a test against each model and compare its accuracy against its original model. We then use the data collected to find the Goldilocks model: the one model that is the smallest for the least loss in accuracy.
For this example I will be using a squeeznet model that I’ve trained to detect from 101 different dishes. I have already converted the model into Core ML and I’m ready to quantize it.
Before we can quantize a model we need to get the latest version of coremltools. At the time of writing, we are on 2.0b1 which is in beta. To get this version we need to run pip install coremltools==2.0b1
The method we are interested in is quantize_weights. lets look at its documentations. For quantize_weights there are four different modes available. However at the time of this writing the modes mentioned in the documentation are different than what is actually available in coremltools. The modes in the documentation are linear, linear_lut, kmeans_lut and custom_lut. The modes that are actually available are linear, kmeans, linear_lut, custom_lut and dequantization. We will omit custom_lut and dequantization since they are beyond the scope of this article and focus on linear, linear_lut and kmeans.
LUT stands for look up table
Once coremltools version 2.0b1 is installed, we can run the following python script. Ensure that the script is located in the same folder that has our original model. This script will create all the possible permutations of bits and functions that quantize a model.
import coremltools

from coremltools.models.neural_network.quantization_utils import *
mode_name = "food"

model = coremltools.models.MLModel(mode_name+".mlmodel")

functions = ["linear", "linear_lut", "kmeans"]

for function in functions :
    for bit in [16,8,7,6,5,4,3,2,1]:
        print("processing ",function," on ",bit,".")
        lin_quant_model = quantize_weights(model, bit, function)
        lin_quant_model.short_description = str(bit)+" bit per quantized weight, using "+function+"."
        lin_quant_model.save(mode_name+"_"+function+"_"+str(bit)+".mlmodel")
First we set mode_name to be equal to the name of the model. This should be the same as the name of the file without its mlmodel extension.
Then we run python run.py to create all the permutations.
In less than ten minutes, we’re proud owners of 27 new models, all in different sizes. We can see that quantization can result in a substantial reduction in size. All quantized models are substantially smaller than the original model.
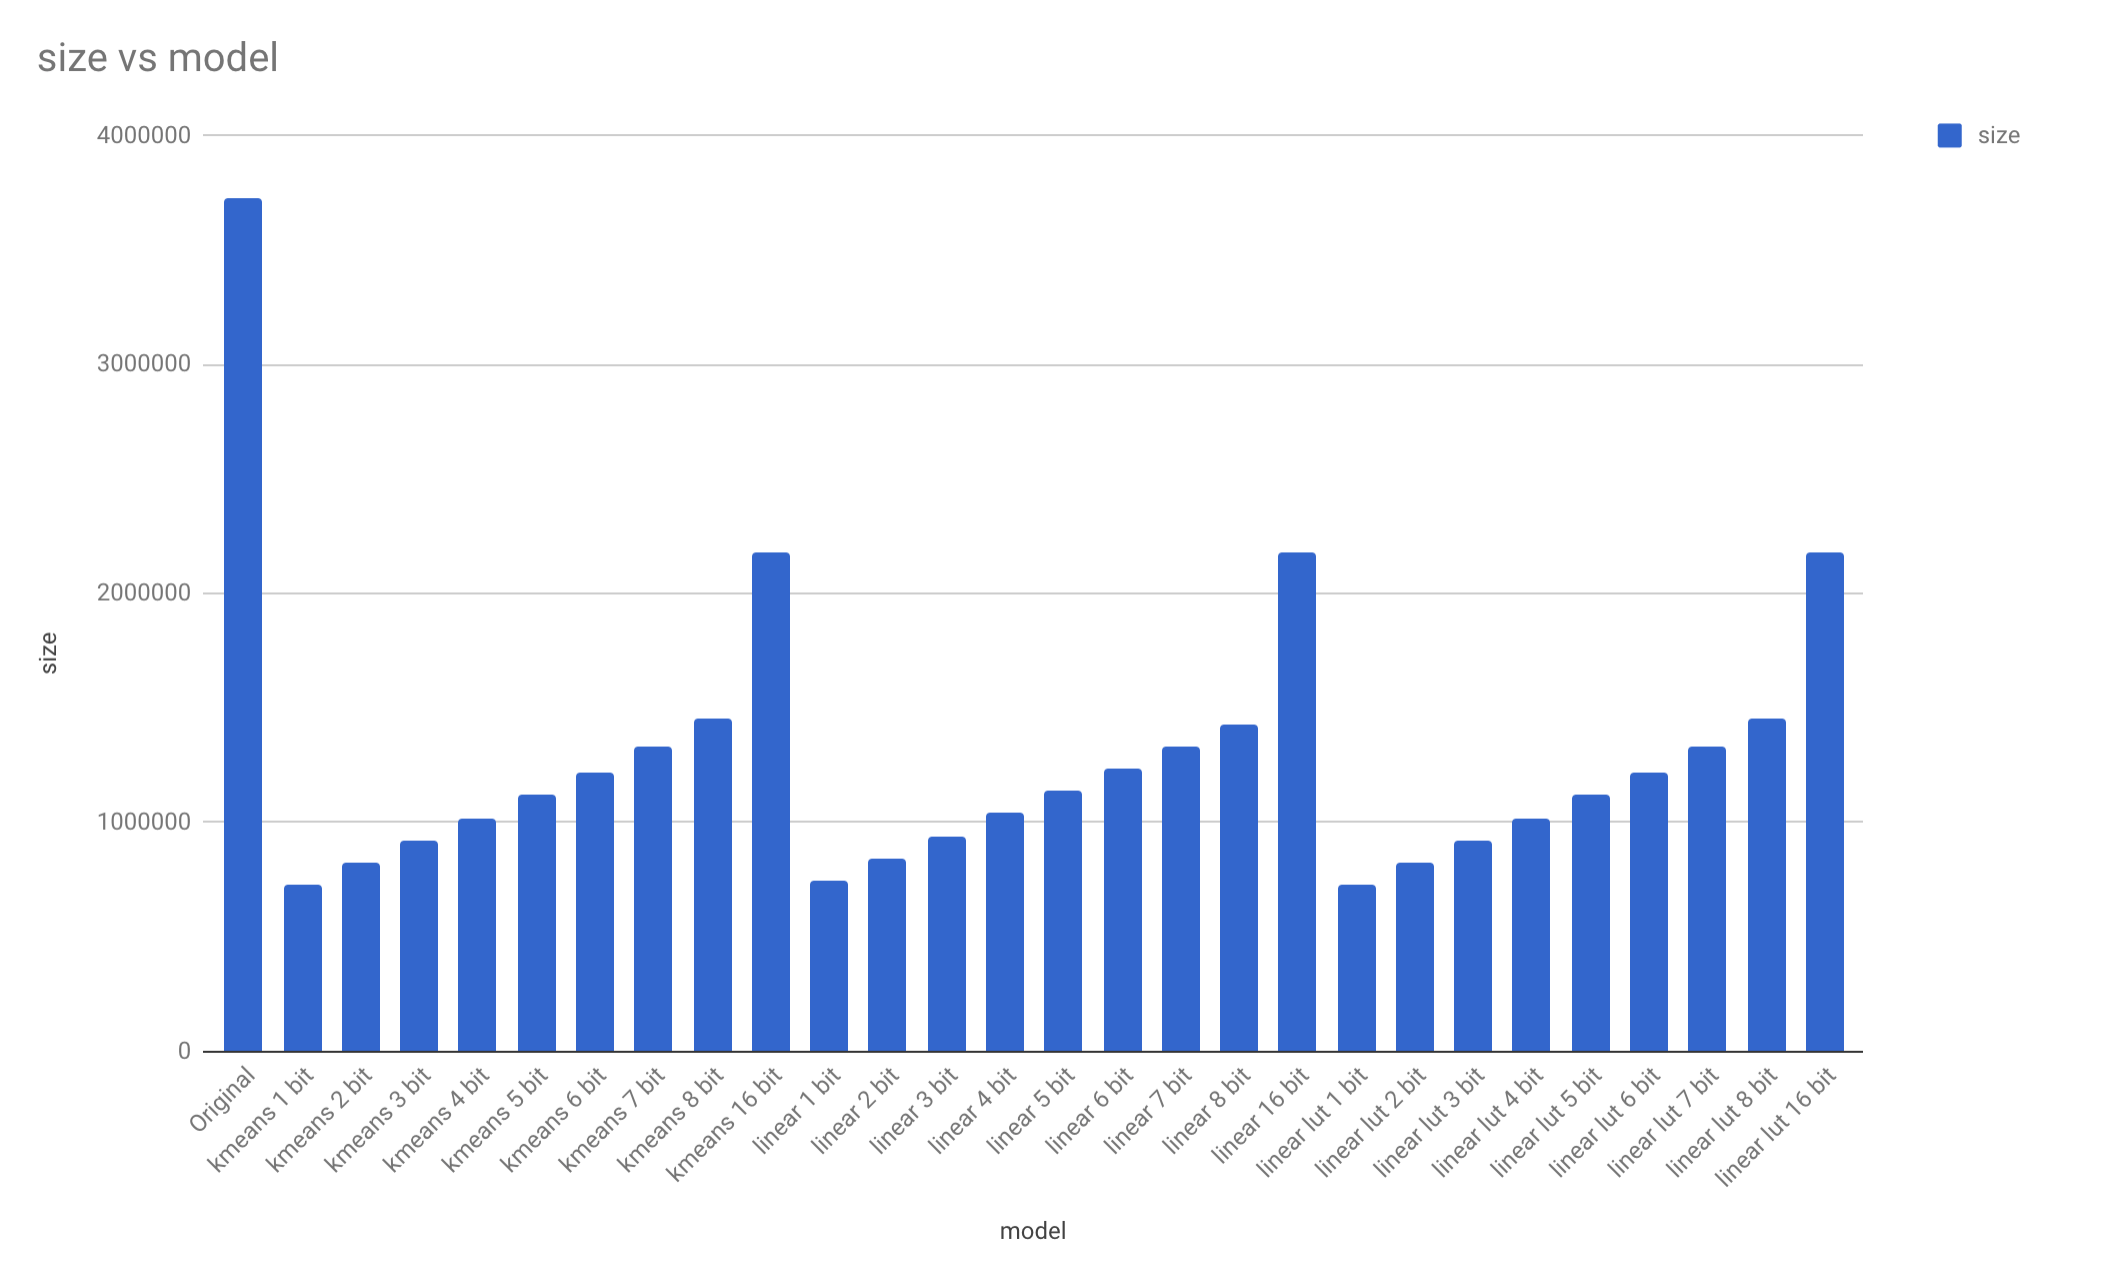
Just by looking at the data, it seems like quantizing to 16 bit reduced the models by 40%. This reveals just how much of a model is actually composed of weights.
Of these 27 models, one holds the most reduction in size for the least reduction in accuracy. The question is, which one?
There are a few options available. First one is a method provided by coremltools called compare_method. Through this method we can pass the original model, the quantized model and a folder of sample images and see how well the two models match.
compare_models(model, lin_quant_model, 'testing_data/pizza')
Analyzing 100 images
Running Analysis this may take a while ...


Analyzed 100/100

Output prob:
--------------
Top 5 Agreement: 100.0%

Output classLabel:
--------------------
Top 1 Agreement: 98.0%
The problem with this method is that there isn’t much we can do with it beyond observing what it prints to the console. Nothing else is returned.
If you want more data and a more comprehensive comparison between multiple models there is another powerful tool available to us: Xcode Playgrounds.
At the time of writing we’re on Xcode 10.0 Beta (10L176w) and macOS Mojave 10.14 Beta (18A293u)
One of many great things about Xcode Playgrounds is that you can perform inference on a fully trained Core ML model directly from the playground. There is no need to create a full-fledged iOS or macOS app.
So with that in mind we are going to start a new Playground. We will iterate through the models and test their accuracy against our test data. We will then save the information we’ve collected from the tests into a CSV file. I have posted one way this can be done below. Although it may seem like a lot of code, it actually doesn’t do anything beyond what I mentioned. If you’re interested in playing around with it here is a link to the repo with the Playground file, models and the test data.
import Vision
import CoreML
import Cocoa

let testingFolder = "/Users/rezashirazian/Projects/Practice/Quantize/testing_data/"

let modelFolder = "/Users/rezashirazian/Projects/Practice/Quantize/"

func getCIImage(url: URL) -> CIImage {
    guard let image = NSImage(contentsOf: url) else {
        fatalError()
    }
    let data = image.tiffRepresentation!
    let bitmap = NSBitmapImageRep(data: data)!
    let ciimage = CIImage(bitmapImageRep: bitmap)!
    return ciimage
}

func getFoldersInDirectory(path: String) -> [String:URL]  {
    guard let contents = try? FileManager.default.contentsOfDirectory(atPath: path) else {
        print("Make sure you have set a correct value for testingFolder and modelFolder variables at the top of this playground.")
        fatalError()
    }

    let contentURLs = contents.map{URL(fileURLWithPath: path + $0)}
    let folders = contentURLs.filter{$0.hasDirectoryPath}
    var result: [String:URL] = [:]
    folders.forEach{
        result[$0.lastPathComponent.split(separator: "_").joined(separator: " ")] = $0.absoluteURL
    }
    return result
}

func getFilesInFolder(url: URL) -> [URL] {
    guard let contents = try? FileManager.default.contentsOfDirectory(at: url, includingPropertiesForKeys: nil, options: .skipsHiddenFiles) else {
        print("Make sure you have set a correct value for modelFolder variables at the top of this playground and that there are models present.")
        fatalError()
    }
    return contents.filter{!$0.hasDirectoryPath}
}

func getImagesFromFolder(url: URL) -> [CIImage] {

    let contents = getFilesInFolder(url: url)
    let images = contents.map {getCIImage(url:$0)}

    return images
}

func getModelsFromFolder(url: URL) -> [(MLModel, String, Int)] {
    let contents = getFilesInFolder(url: url).filter{$0.absoluteString.hasSuffix(".mlmodel")}
    //var result : [(MLModel, String, Int)] = []
    var result : [(MLModel, String, Int)] = []
    contents.forEach {
        //print("adding model: \($0.absoluteString)")
        let fileSize = (try! FileManager.default.attributesOfItem(atPath: $0.path)[FileAttributeKey.size] as! NSNumber).intValue
        let name = $0.lastPathComponent
        let model = try! MLModel(contentsOf: MLModel.compileModel(at: $0))
        result.append((model, name, fileSize))
    }
    return result
}

func calculateAccuracy(images:[CIImage], label: String, model: MLModel) -> Double {
    guard images.count > 0 else {
        print("Make sure you have set a correct value for testingFolder variables at the top of this playground and that there are test images present.")
        fatalError()
    }
    var matched = 0

    do {
        let visionModel = try VNCoreMLModel(for: model)
        let visionRequest = VNCoreMLRequest(model: visionModel) { (request, error) in
            let result = request.results as? [VNClassificationObservation]
            if let matchLabel = result?.first?.identifier {
                //print("was hoping for  \(label) got  \(matchLabel)")
                if matchLabel == label {
                    matched += 1
                }
            }
        }
        let handler = VNSequenceRequestHandler()
        for image in images {
            try handler.perform([visionRequest], on: image)
        }

    } catch (let error) {
        print (error)
    }

    return Double(matched) / Double(images.count)
}

func calculateAccuracy(images: [String: [CIImage]], model: MLModel) -> [String: Double] {
    guard images.values.count > 0 else {
        fatalError()
    }

    var result: [String: Double] = [:]

    images.keys.forEach { key in
        if let images = images[key] {
            result[key] = calculateAccuracy(images: images, label: key, model: model)
        }
    }
    return result
}

let folders = getFoldersInDirectory(path: testingFolder)

var images: [String: [CIImage]] = [:]

folders.keys.forEach {
    if let value = folders[$0] {
        images[$0] = getImagesFromFolder(url: value)
    }
}

let models = getModelsFromFolder(url: URL(fileURLWithPath: modelFolder)).sorted { left, right  in
    return left.1 < right.1
}

print("report for \(modelFolder)")
print("total of \(models.count) models")
var csv = "model, size,"
var firstLine = true
for (model, name, size) in models {
    print("\tmodel:\t\(name)")
    print("\tsize:\t\(size)")
    let accuracyReports = calculateAccuracy(images: images, model: model)
    if(firstLine) {
        csv += accuracyReports.keys.sorted().joined(separator: ",") + "\n"
        firstLine = false
    }
    csv += "\(name),\(size),"
    for report in accuracyReports.keys.sorted() {
        print("\t\t\(report):\t\t\t\(accuracyReports[report]!)")
        csv += "\(accuracyReports[report]!),"
    }
    csv += "\n"
    print("\n")
}
let destination = URL(fileURLWithPath: modelFolder + "result.csv")
try! csv.write(to: destination, atomically: true, encoding: String.Encoding.utf8)
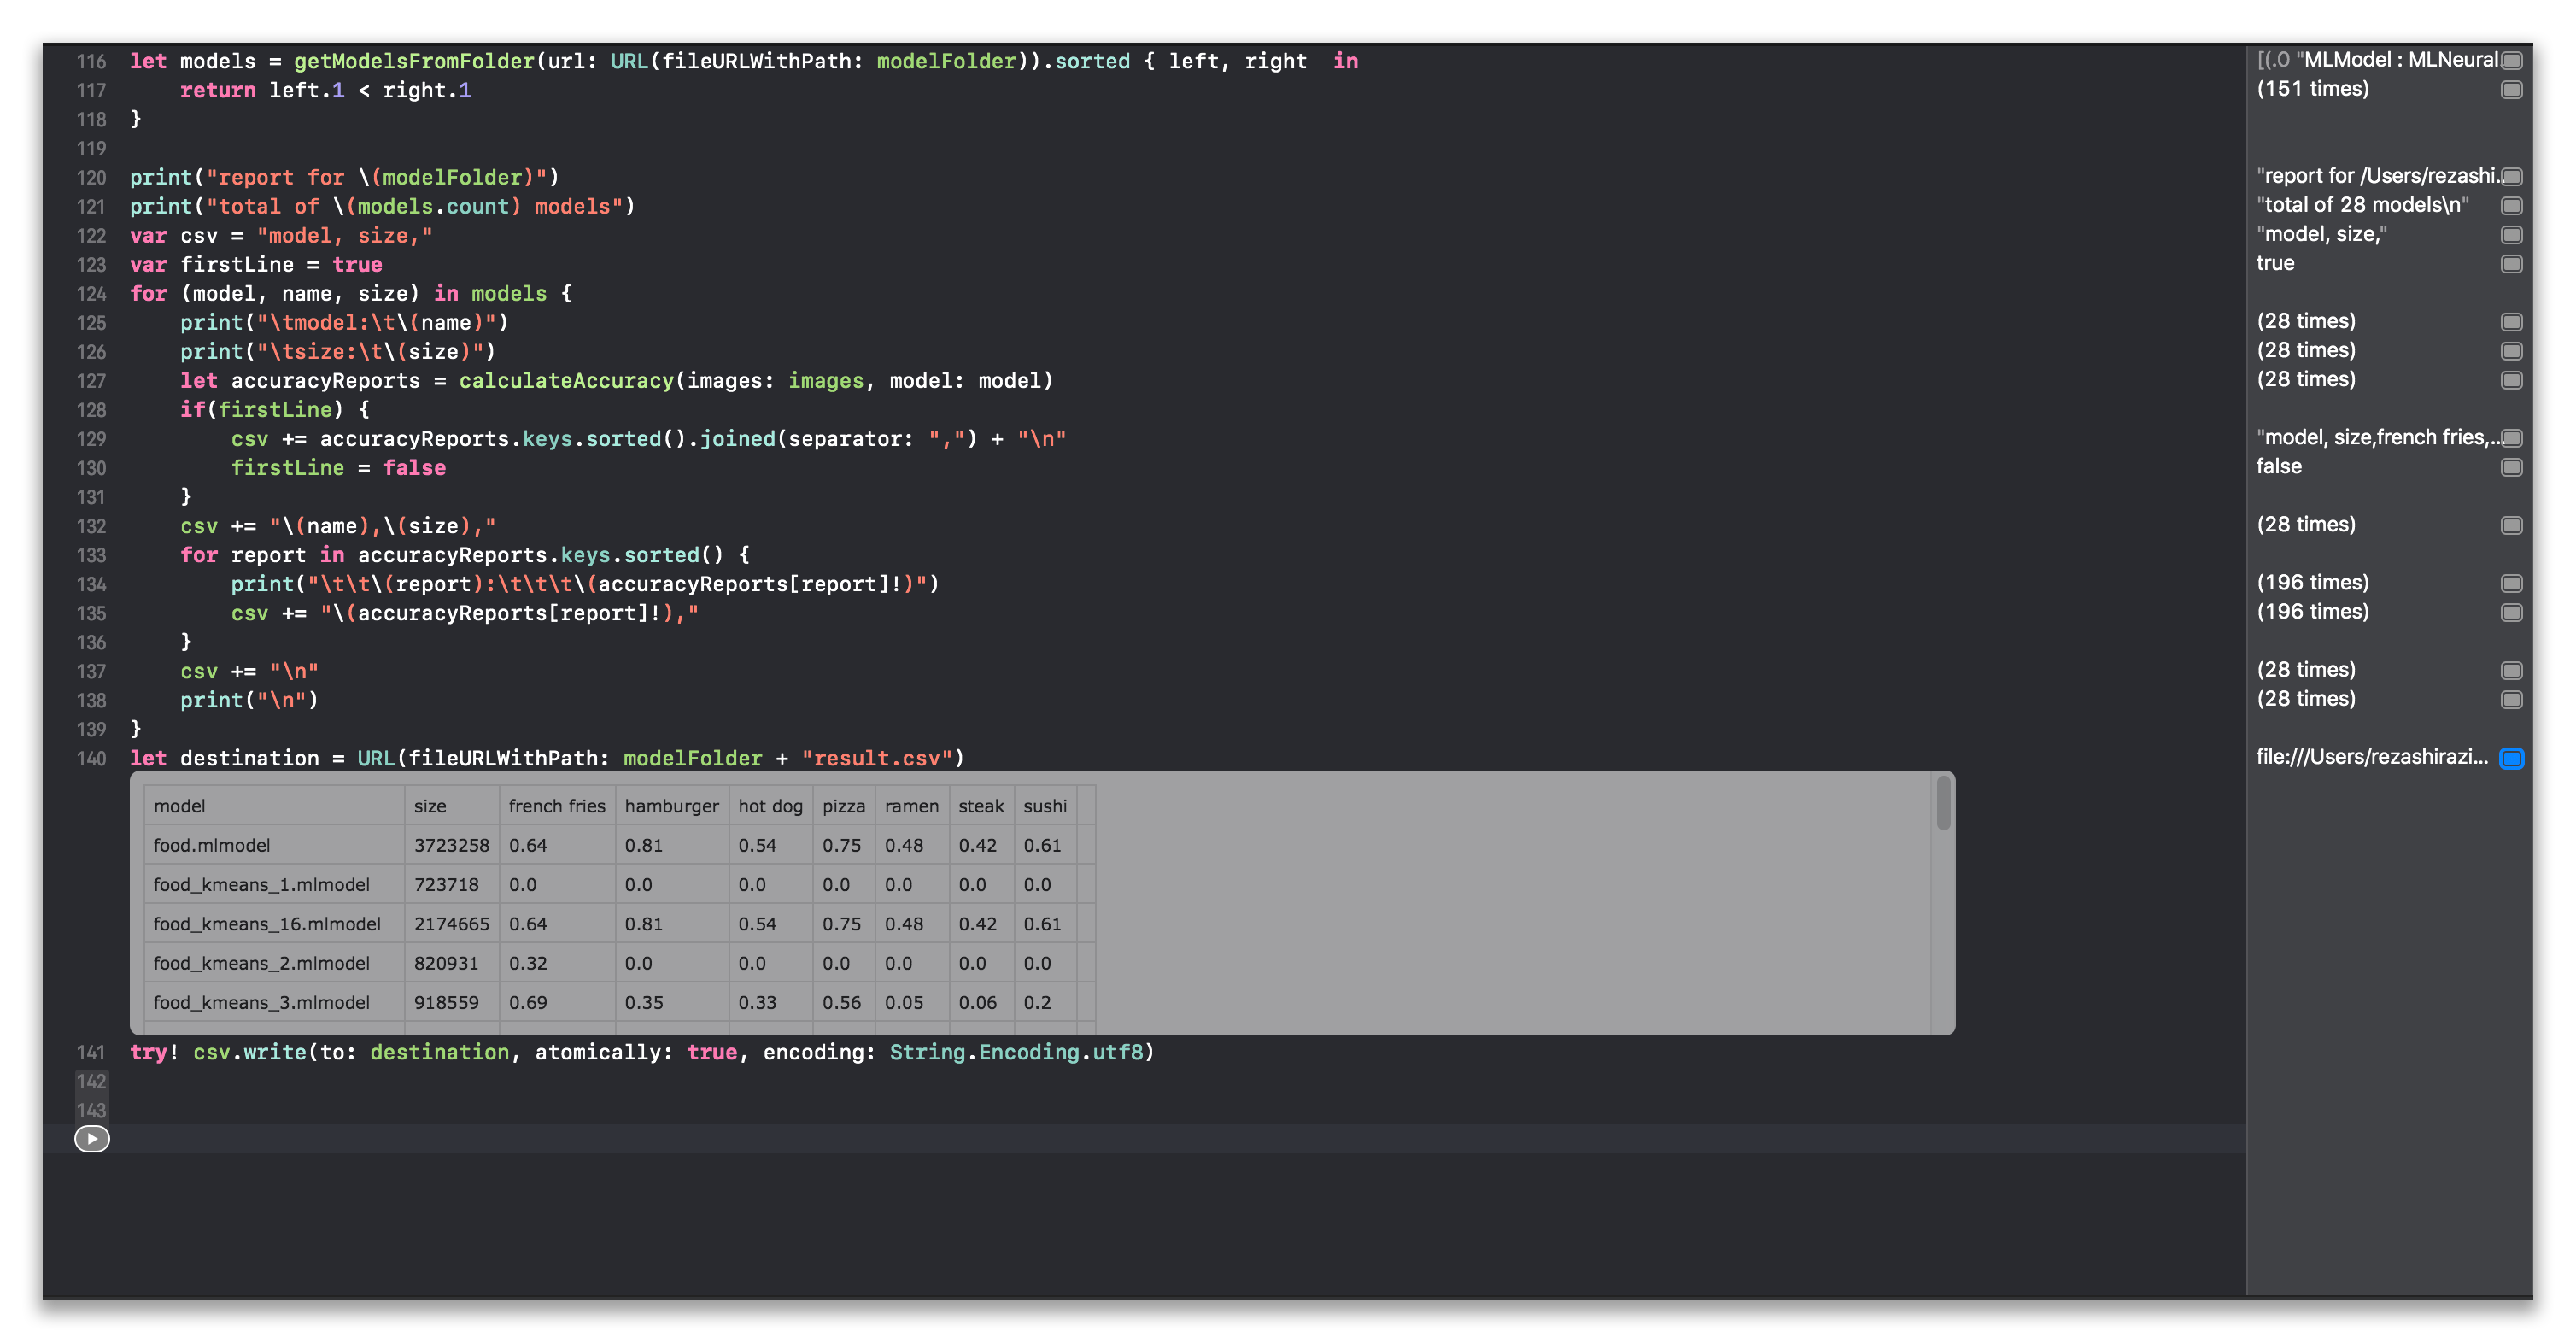
Playground will display csv data inline. I did not know about this and was pleasantly surprised to see it.
Our test data is spread among seven categories: French fries, hamburger, hot dog, pizza, ramen, steak and sushi. There will be 100 images for each category, none of which was used during training.
When we test our original model we end up with the following accuracy result. This is fairly inline with what I got when I was training the model on DIGITS.
    model:  food.mlmodel
    size:   3723258
        french fries:           0.64
        hamburger:              0.81
        hot dog:                0.54
        pizza:                  0.75
        ramen:                  0.48
        steak:                  0.42
        sushi:                  0.61
Steak always performs low since there are too many dishes that look similar to it (filet mignon, beef tartare, pork chop, prime rib)
Now that we have a base accuracy we can compare how our quantized models fairs against our test data.
Lets look at all the 16 bit quantized models and see how they compare against the original.

The original trained Squeeznet stands at 3723258 bytes or 3.7 MB. At 16 bit quantized, the model is downsized to 2174665 (2174669 for linear lut)or 2.1 MB. This is a 42% reduction. Let see how much this affected our accuracy:

The results are 100% equal for all test cases. There was 0 reduction in accuracy. Just by quantizing to 16 bit we managed decrease the size of our model by 42% at no cost to accuracy.
But lets see if we can do better. Lets see how our 8 bits model performed:

Our 8 bit quantized models are reduces to 1.45 MB (there is negligible difference between the different functions). This is a 61% reduction in size. Lets see how this affects our model’s accuracy.

We can see there are some differences between the original model’s accuracy and the quantized 8 bit models. However these differences are fairly minuscule. At most we get a +/-3% change, but on average the models perform the same as the original with a +/- 1% difference.
What’s interesting, is that some models have their accuracy increase against the original. This means for some images, the quantized model’s prediction did not match the original model, but it did match the actual label. This may seem a bit counterintuitive but given how we’ve constructed our test it’s possible to see a quantize model perform slightly better than the original for a specific category. This doesn’t mean the model is more accurate, it only means that it may have become more bias to classify an item as one thing after quantization. This results in a spike in accuracy in one category, but comes at the cost of reduced accuracy in others categories. There is a very good example of this further down at three bits. (a model that thinks everything is a hot dog)

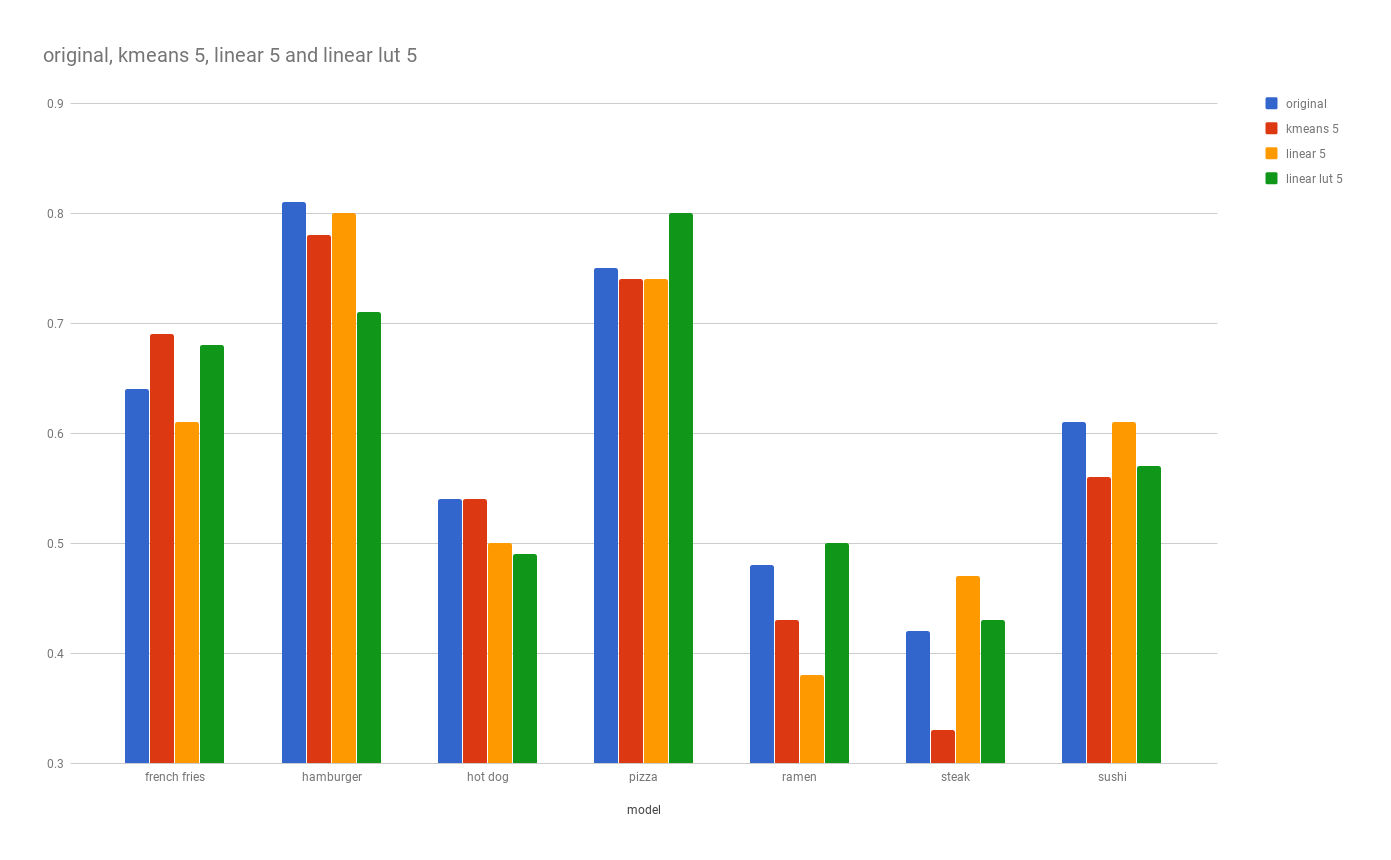
Lets look at the results for seven, six, and five bit models. For size, we get a 100kb discount for every drop in bit but we also start to see a wider range in discrepancy in accuracy. The discrepancy widens as we use less precise value type. This is expected.

What’s interesting is that for some labels, the change is not as significant. For example, pizza remains in the 75% prediction rate even as we drop our accuracy to 5 bit. However steak and ramen’s accuracy display more sensitivity to quantization.
As for four, three and two bit models, this is where everything falls apart. We continue to see our size reduced by the same rate, but the drop in accuracy is immense.
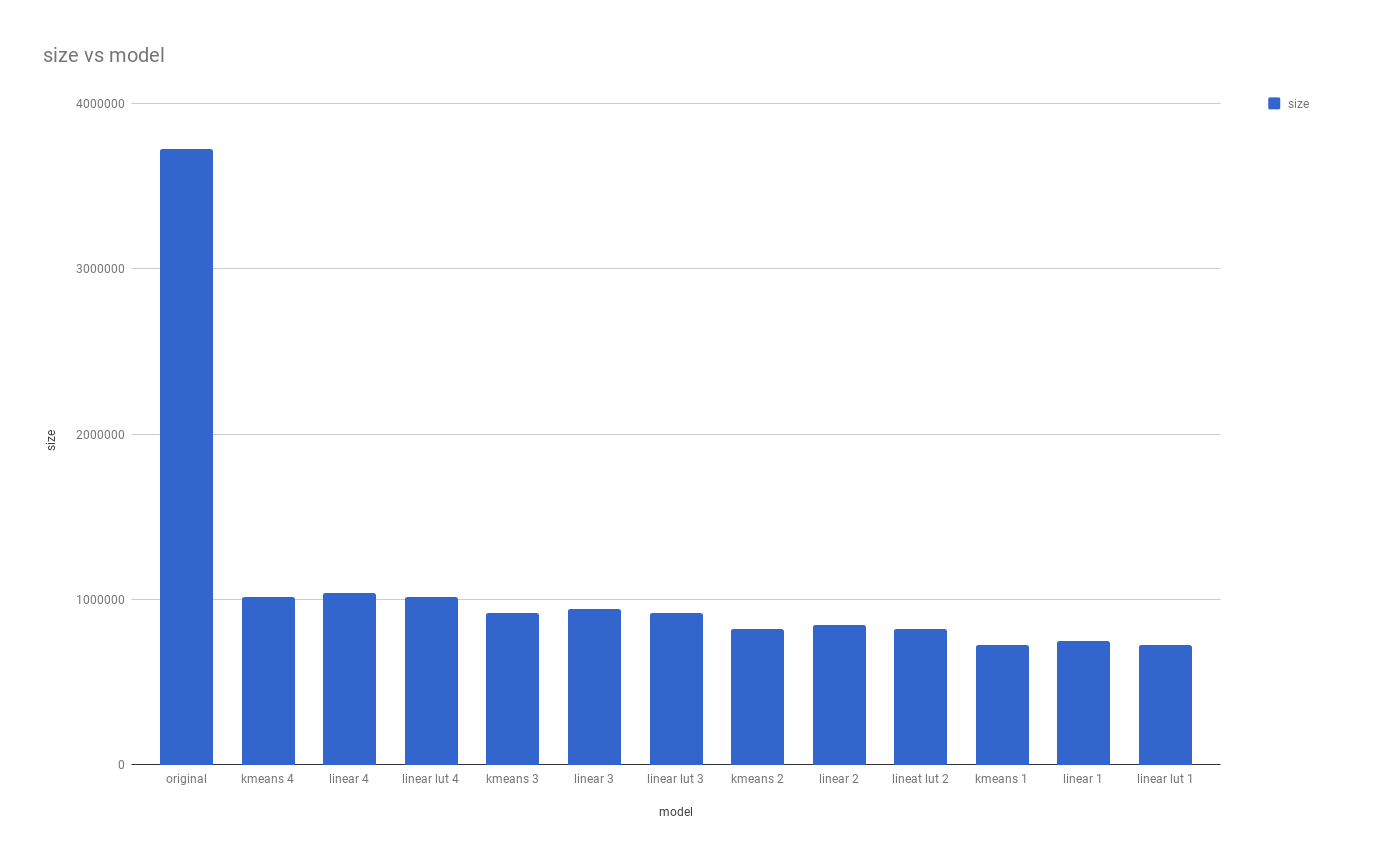
Given that quantizing reduces the number of available values for each weight by half, it’s not surprising to see our models falling apart as we enter the lower bits. The best performing model out of the group is the four bit even though that one doesn’t fair any better against the 5+ bit quantized model. It’s fair to disqualify all models 3 bit and below. I can’t imagine any scenario where they would be a better fit against other models we have quantized so far.
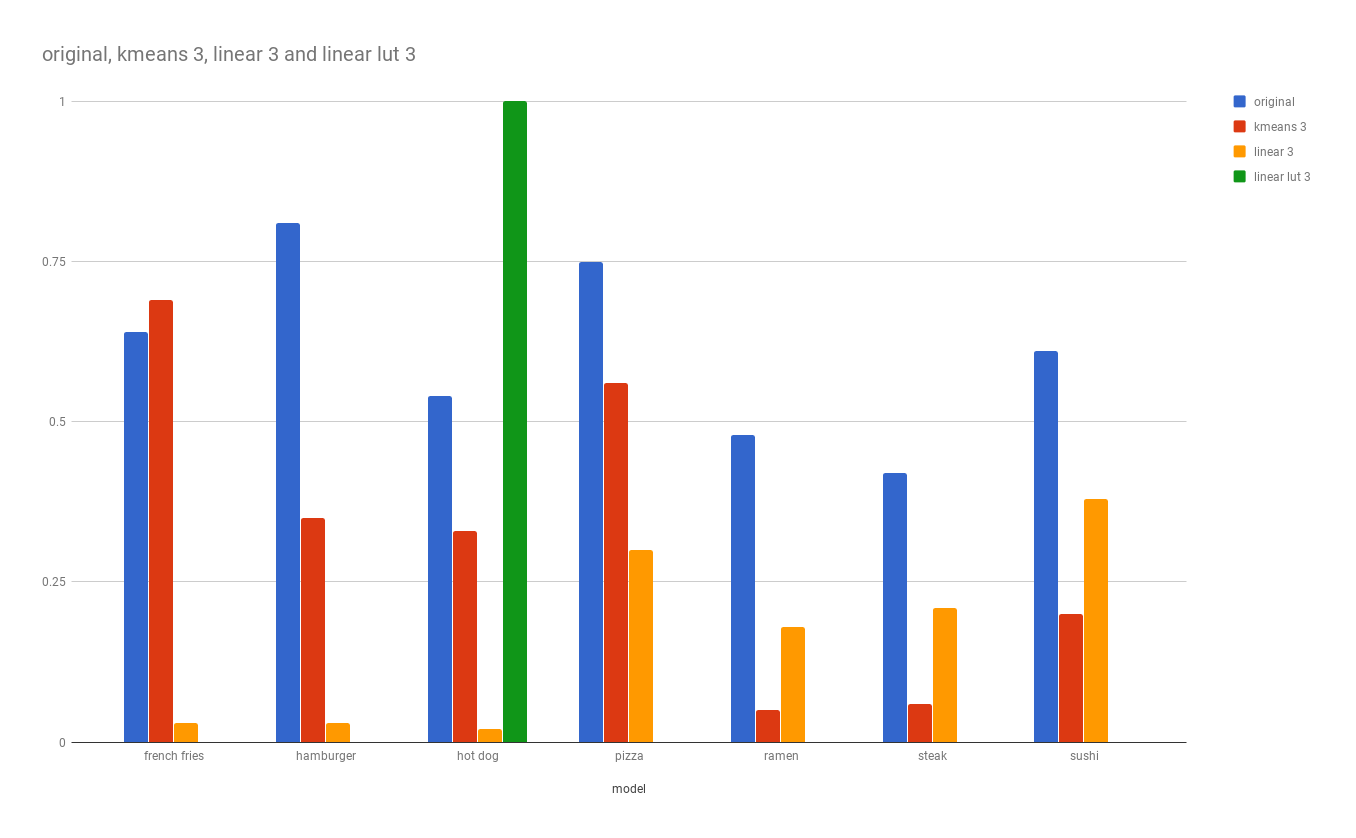
That being said it’s interesting to see that at 3 bits, our kmeans model was able to detect french fries 69% of the times which is higher than the original but failed at 3% and 0% at linear and linear look up table.
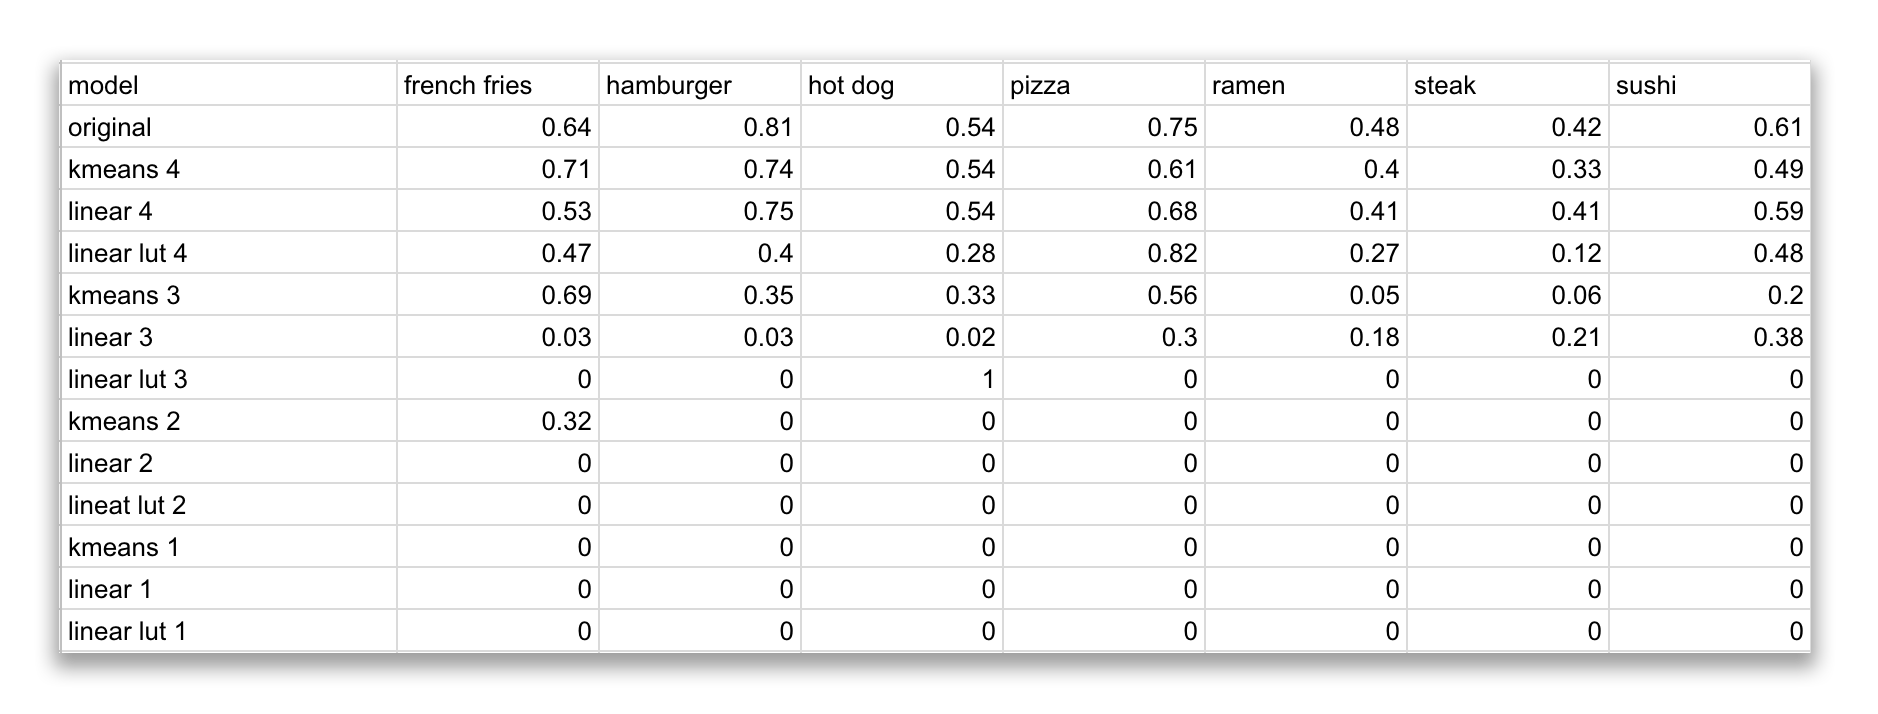
Of course looking at the charts, you might be tempted to use the three bit linear lut model for your hotdog detection. What’s better than a model that has a 100% accuracy rate for hot dog? Well this chart might be a bit misleading as this model thinks EVERYTHING is a hot dog. Hence why its accuracy for everything else is at a 0%. As mentioned earlier the quality of the model is not dependent on its specific category detection but an aggregate of how it performs against all categories being tested.
So what is the best model? Since we decided the smallest model with the least difference in accuracy against the original is our best candidate. We could argue according to our test data, that the eight bit kmeans quantized model with a reduction of 61% in size and an average of 0.5% reduction in accuracy is the best choice.
It’s important to note that our classifier in this example detects from 101 different categories and we only tested for eight of those. During our testing we learned that some categories are more sensitive to quantization, and for that reason, I would hesitate to go any lower than eight bits even though our data shows we’re still getting acceptable results at seven or six. If we had to go lower, I would suggest running larger tests with samples in each category to ensure consistent quality.

For us, we got a good deal when we went from 32 to 16. There was no change in accuracy and we got a 40% drop in size. When we reduced to eight we got a 60% drop in size and a 1-2% change in accuracy. If that is unacceptable, we can still go with the 16 bit, get a 40% discount in size without any loss in accuracy (according to our test at least.)
I hope this post helps you get a better understanding of what is quantization, how it can help you reduce the size of your trained model, and how you can take advantage of Xcode playground and fast inference to figure out what’s the best option when quantizing your model.
Feel free to contact me on twitter (@kingreza) if you have any questions or suggestions.
You can find the python script for creating all the quantized models, the Xcode playground for testing, the test data and all the results in this repo.